In my last blog post I introduced my small personal project called Typespiration. Now I’d like to share some thoughts with you behind the development process.
Please note that this is completely a side project for me. Of course, I could add more features and choose a different platform than WordPress to build the entire website. However, my goal was to create a simple website and use the system I already know.
Allow me to explain why I chose to make it all simple…
The idea and design
The idea to create typespiration.com hit me a long time ago. Most ideas can start out simple, but over time can start growing into a gigantic project that finally threatens to overwhelm you. I used to have many of these kinds of projects in my head. I put all of them on the side and thought that one day, I would complete them…
A couple of months ago I started following Sacha Grief’s blog. On his blog, I read about a process behind the simple side project called The Toolbox. I really liked how a quick idea could be transformed to a live website in such a short amount of time and with so little effort (he launched his side project in 10 hours!).
Sacha inspired me and I decided that I needed to take one of my ideas, simplify it as much as possible and then just launch it.
So, I crossed out a bunch of functionalities and features from the previous gigantic concept. I decided to make a simple website based on WordPress and use the Genesis framework as a parent theme.
I want you to know that I never had any business plan behind typespiration.com and I’m not planning to monetize it in any way. This decision made it even simpler and pretty straight forward. I just wanted to create a website where other people could sign up and share their typography with other designers.
I tried to incorporate this same “simplicity” policy into the design as well. I knew the website would be full of different designs, fonts and colorful examples and I didn’t want the website design to interfere with the content.
I needed a sharp and bold design that would create a good visual framework that would be separate from all the submitted designs. I chose a contrast color scheme which included a white background, black text and a turquoise color for a highlight.

In the next step I created the logo and a basic design concept in Photoshop.
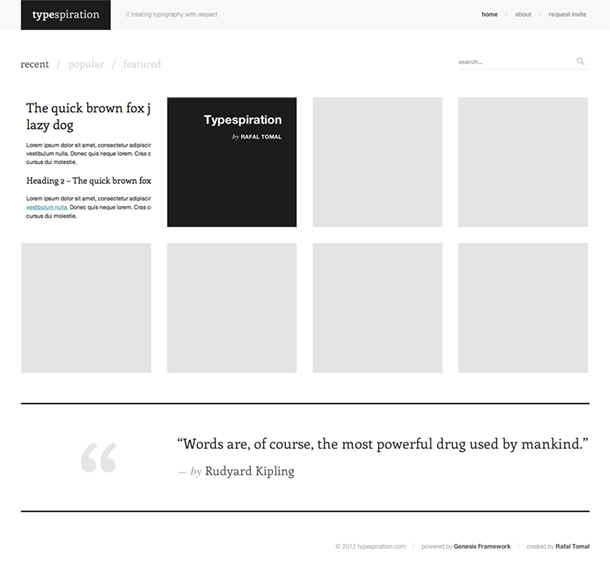
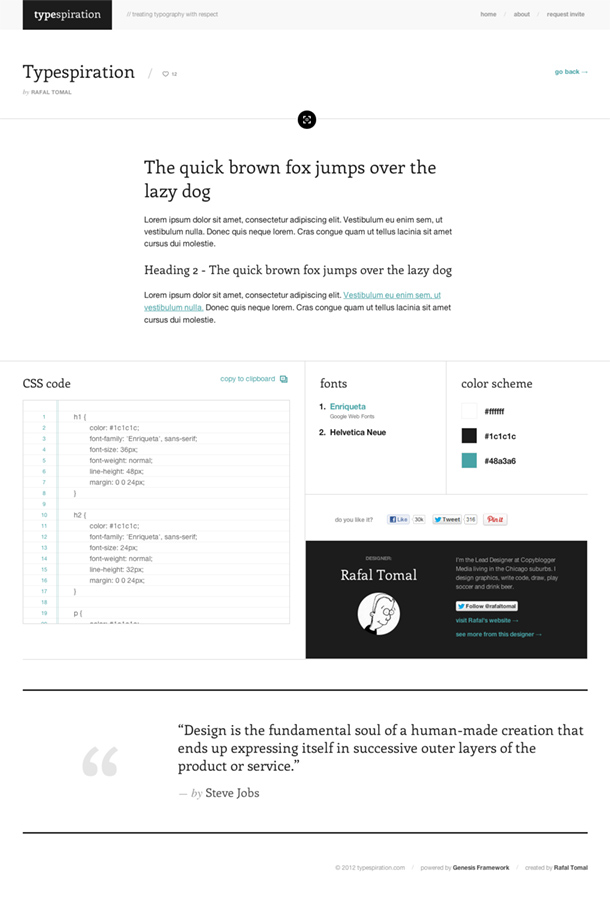
Since the website is straightforward, I needed to design only the home page and a single post.
Custom theme features
As I mentioned before, I chose WordPress and the Genesis framework as a base for the entire website. These are the platforms I’m most familiar with and there are almost no limits as to what I needed to create.
The Genesis framework let me save a lot of time in creating the front-end visual structure. Therefore, I could focus on what was most important and code all the custom functionalities.
The first thing I needed to add was a custom post type to store all the typography styles. I used the register_post_type() function in order to register the custom post type:
add_action( 'init', 'custom_post_type' );
function custom_post_type() {
    register_post_type( 'type',
        array(
            'labels' => array(
                'name' => __( 'Typespiration' ),
                'singular_name' => __( 'Type style' ),
            ),
            'has_archive' => true,
            'public' => true,
            'rewrite' => array( 'slug' => 'types', 'with_front' => FALSE ),
            'taxonomies' => array( 'tags' ),
            'supports' => array( 'title', 'author', 'thumbnail' ),
        )
    );
}
Next, using the register_taxonomy() function I registered a custom taxonomy “Tags” and connected it with my custom post type:
add_action( 'init', 'custom_tag_taxonomy' );
function custom_tag_taxonomy() {
     register_taxonomy(
          'tags',
          'type',
          array(
              'hierarchical' => false,
              'label' => 'Tag',
              'query_var' => true,
              'rewrite' => array('slug' => 'tag')
          )
     );
}
One of the biggest challenges of this project was to make adding new typography styles very easy for new registered users. To make this possible, I needed to create custom meta boxes for all the information that needed to be entered. Here is how it looks in the WordPress admin panel:
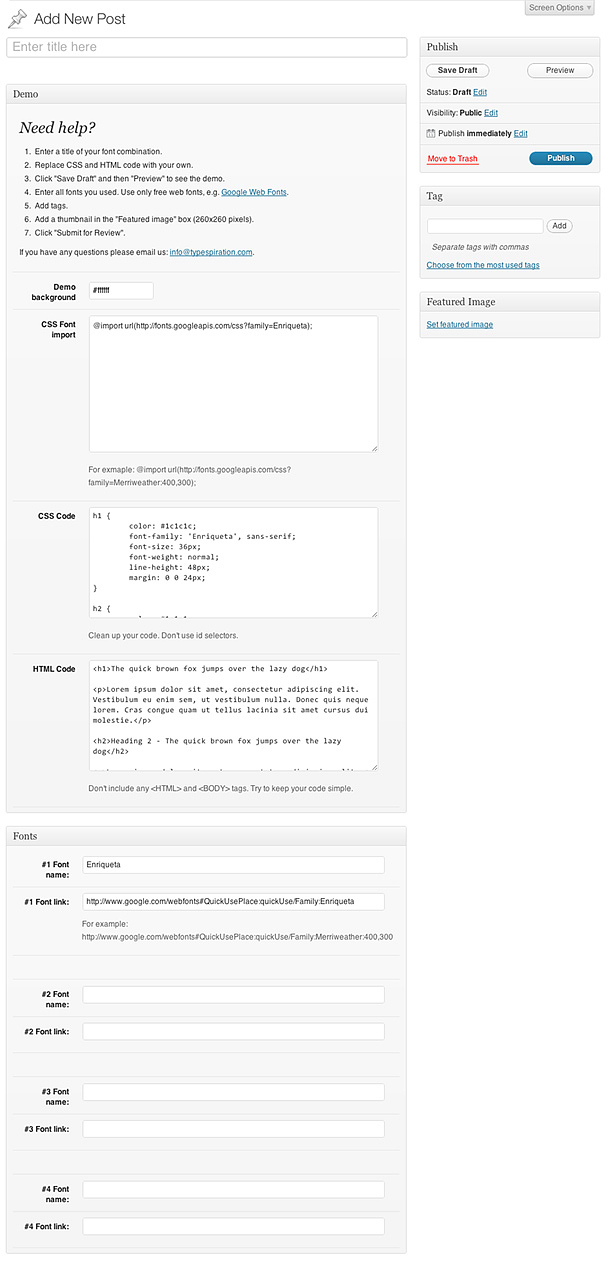
I used the Custom Meta Boxes script created by Bill Erickson, Jared Atchison and Andrew Norcross. The script is incredibly easy to use and lets you quickly create different kinds of input fields and add it to the custom post type edit page.
First you need to initialize the metabox class:
add_action( 'init', 'cmb_initialize_cmb_meta_boxes', 9999 );
function cmb_initialize_cmb_meta_boxes() {

     if ( ! class_exists( 'cmb_Meta_Box' ) )
          require_once 'cmb/init.php';

}
Then, here is a part of the code I used to create the demo box:
add_filter( 'cmb_meta_boxes', 'custom_metaboxes' );
function custom_metaboxes( array $meta_boxes ) {

     $prefix = '_cmb_';

     $meta_boxes[] = array(
          'id'         => 'demo_metabox',
          'title'      => 'Demo',
          'pages'      => array( 'type' ),
          'context'    => 'normal',
          'priority'   => 'high',
          'show_names' => true,
          'fields'     => array(
               array(
                    'name' => 'Demo background',
                    'id'   => $prefix . 'demo_bg',
                    'type' => 'colorpicker',
                    'std'  => '#ffffff'
               ),
               array(
                    'name' => 'CSS Font import',
                    'id'   => $prefix . 'font_include',
                    'type' => 'textarea',
                    'desc' => 'For exmaple: @import url(http://fonts.googleapis.com/css?family=Merriweather:400,300);',
                    'std'  => '@import url(http://fonts.googleapis.com/css?family=Enriqueta);'
               ),
               array(
                    'name' => 'CSS Code',
                    'id'   => $prefix . 'css_code',
                    'type' => 'textarea_code',
                    'desc' => 'Clean up your code. Don't use id selectors.'
               ),
               array(
                    'name' => 'HTML Code',
                    'id'   => $prefix . 'html_code',
                    'type' => 'textarea_code',
                    'desc' => 'Don't include any <HTML> and <BODY> tags. Try to keep your code simple.'
               ),
          ),
     );

)
It’s just that simple as building an array of all the elements. The script supports a few more kinds of input fields like radio boxes, check boxes, date/time picker, drop down options, etc. I use this script very often in my projects.
User registration
I wanted to have full control over the user registration. The idea was to create a form that people needed to fill out first and send to me, so I could verify if they were really designers.
To build the entire user’s registration process I used three WordPress plugins:
In the first step, I created a simple “Request Invite” form using Gravity Forms plugin:

Next, I set up a new feed in the User Registration Add-On:
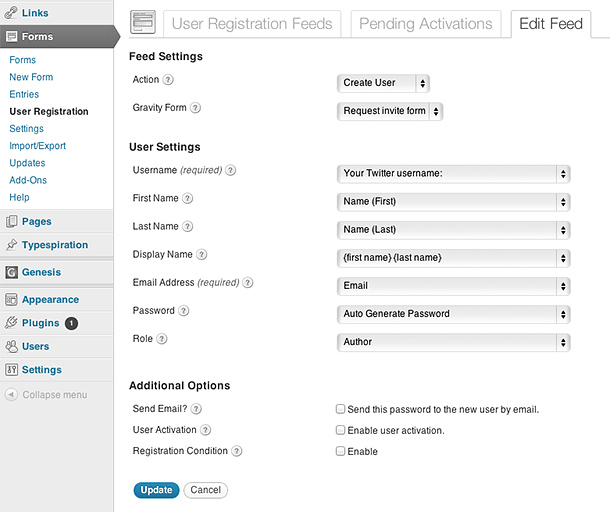
So far, so good. It’s been very easy to make these two things work. Now, everyone who fills out the “Request Invite” form is automatically registered in the WordPress system as a new user.
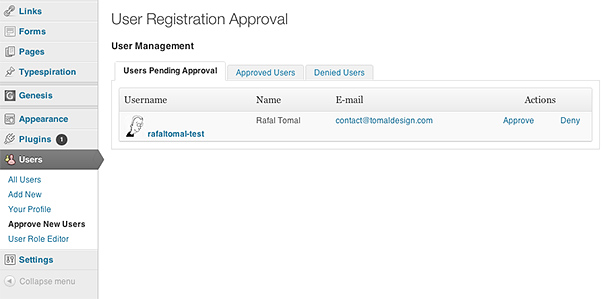
I needed a possibility to either “Approve” or “Deny” the requests. The “New User Approve” plugin does it for you. Before a new user is completely registered in the system, it goes under the “Users Pending Approval” box, where you can decide what you want to do with that user.
The last step in the user registration process was the customization of the email messages. To make this happen, I filtered the plugin:
add_filter( 'new_user_approve_approve_user_message', 'custom_approve_email' );
function custom_approve_email( $message ) {

     $message = 'Your custom email approve message.';

     return $message;
}

add_filter( 'new_user_approve_deny_user_message', '' );
function custom_deny_email( $message ) {

     $message = 'Your custom email deny message.';

     return $message;
}
The user registration process was complete.
WordPress admin panel customization
Customizing the administration panel was the last part of the theme development process. I did a few easy tricks to add a few personal touches to the WordPress system.
First, I customized the login page:
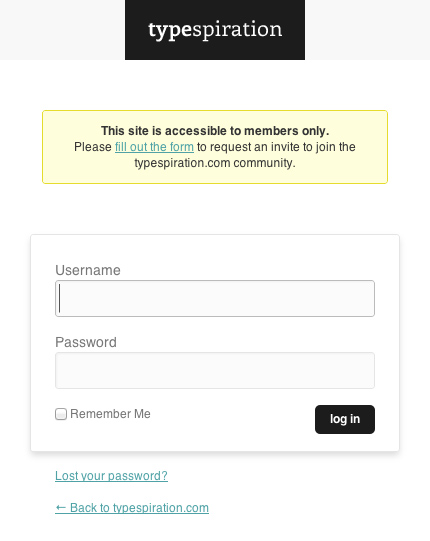
I created the login.css file in the main theme folder and added the following code to the functions.php file:
add_action( 'login_head', 'login_css' );
function login_css() {
    wp_enqueue_style( 'login_css', CHILD_URL . '/login.css' );
}
This let me use my own CSS in order to change the login page look. Check out the login.css file to see how it’s made.
Next, I removed some of the unnecessary menu items:
add_action( 'admin_menu', 'remove_menu_items' );
function remove_menu_items() {
     global $menu;

     $restricted = array( __( 'Comments' ), __( 'Posts' ), __( 'Tools' ), __( 'Dashboard'  ) );

     end ( $menu );

     while ( prev( $menu ) ){

          $value = explode( ' ',$menu[key( $menu )][0] );

          if( in_array( $value[0] != NULL?$value[0] : "" , $restricted) )
               unset( $menu[key( $menu )] );

     }
}
Summary
Looking for solutions to your project problems may not be easy. Sometimes you need to be very flexible in using already-made plugins and mix it with your own code.
Before you start writing your own custom code, always make sure there is nothing like it already out there.
I skipped the theme styling process and Genesis child theme development guidelines in this post. However, if you have any questions about this part of the project, please ask me in the comments and I’ll try to answer all of them.
Nicely done, Rafal. I always enjoy your “behind the scenes” posts. I’m hoping to contribute to the Typespiration site down the road.
Thank Carrie. Looking forward to your contribution 🙂
Cool!
Wondering:
1. How do you add the “copy to clipboard” ?
2. How do you output the color for the color scheme?
Thanks.
1. I used zClip jQuery script: http://www.steamdev.com/zclip/
2. I used a regular expression to find all strings between # and ; in the CSS code: preg_match_all( ‘/#(.*?);/’, $css, $matches);
$css – source: the CSS code
$matches – destination: an array with all hex colors
Awesome! How’d you output the css and html code to the front end? Would it work with PHP too?
You can “echo” any code to the front end but it would be dangerous to let anyone “execute” any PHP code 😉
“it would be dangerous to let anyone “execute” any PHP code”
Are you using any code do filter the result code before output?
Hey Rafal, I appreciate you understanding how to code as a designer. I know that it’s a skill you’ve developed by doing, but do you mind sharing the resources you used when you first started learning it?
I don’t have one specific source. That was a long time process in my case and if you read my blog (http://rafaltomal.com/a-story-of-my-first-client-who-changed-my-life/), you know I usually chose books and study them. First I learned HTML, CSS and later PHP and JavaScript.
I thought that’d be the case. By the way, I used the Minimum theme for my last two clients and I’ve enjoyed learning how responsiveness works. Thank you for your wonderful work over there.
“growing into a gigantic project”
I hope that in ten years time web pages will be simpler than they are now. I’d love to see a commonly used, simple layout, that makes it easy for anyone to put their info online cleanly and beautifully with a very short learning curve. So many people have great content and ideas but are put off by the complexity of “web design”.
If you, or one of the contributors to your blog, take us closer to this, you might just change the world (for some folks at least 🙂
“Everything Should Be Made as Simple as Possible, But Not Simpler”
Well said, Philip!
I think you’re going to like the direction we’re taking StudioPress themes next year.
Thank you for your comment.
Nice! Thanks for this – it will help me learn similar methods for other sites I’m thinking of.
Any chance you would share the script for the scrolling effect?
Thanks
Steve
Steve,
As I mentioned on Twitter, this is JavaScript that you can easily find in the source code: http://typespiration.com/wp-content/themes/typespiration/js/custom.js
The are two actions that open and close the full-screen demo:
$(‘.full-preview’).click
$(‘.close-preview’).click
It adds or remove “demo-full-preview” class in the “#type-demo” div.
Thanks Rafal – I wanted to make sure I wasn’t “stealing” code. I appreciate the reply.
Steve
Wow Rafal. Really wonderfull, but I have a doubt what code put you for change the original login message in wp and where?
Roberto, this message was added by the “New User Approve” plugin and I only customized it adding this filter to the functions.php file:
add_filter( ‘new_user_approve_welcome_message’, ‘custom_welcome_message’ );
function custom_welcome_message( $welcome ) {
$welcome = ‘Your custom message here…’;
return $welcome;
}
Thks Rafal 🙂
thanks for sharing!
I need it to website.
I created my blog page on a Brian Gardner tutorial, can you create one on how to get the feature picture left and right as your or the APPARITION THEME Mine is ELEVEN40 THEME
Hi Rafal,
Thanks for this awesome and detailed “Making of Typespiration”. I know that you might be busy, but can you do a similar “making of chrisbrogan” post?
Thanks
Hi Rafal, hope you are well
Could you point me in the right direction for how to display all the custom meta boxes info the user enters on the actual page?
It will be used for product details, and the user can enter in the ‘description, stock, images, and other details i create using meta boxes, but how do i get all this to display on the page?
You can display it all like normal custom fields, for example:
echo get_post_meta( $post_id, ‘_cmb_css_code’, true );
Read more about get_post_meta() function: http://codex.wordpress.org/Function_Reference/get_post_meta
Rafal, this is an amazing project. I absolutely love it.
Thank you for sharing the blueprint and its end product – typespiration.
Such a beautiful work it is. Just picking my jaw up…so incredibly lovely of a complete project. Thanks for sharing.